The photo store lets your clients, their guests and visitors to your website buy digital copies of your photos. You choose a price per photo and for the whole gallery, choose which photos are for sale, and buyers pay you straight into your own Stripe account. RebookMedia keeps a small store fee.
This article walks you through setting up the store, creating price sheets, and selling from a gallery and from your portfolio on your website.
Where to find it: At the top right of the page, click the grid icon (Navigation Panel) and choose Storefront, then click Store in the left menu.
In this article
- How the photo store works
- Before you start
- Store settings
- Create a price sheet
- Sell from a gallery
- Choose what is for sale
- Free downloads and your client
- Sell from your portfolio and website
- Sales tax on store orders
- Troubleshooting
- Related articles
How the photo store works
- What you sell: digital photos, full size. Buyers can buy single photos or, in a gallery, the whole gallery at once. Prints aren't available yet.
- Who buys: anyone who can open the gallery (your client and the guests they share it with), and visitors to your website.
- How buyers pay: by card, Apple Pay or Google Pay, in US dollars. They sign in with their email (or Google) and enter a US billing ZIP code.
- How you get paid: the payment goes straight to your Stripe account and is paid out on your usual Stripe schedule.
- What it costs: a store fee, a percentage of each sale that depends on your plan (for example 15% on the Starter plan). It is never charged on sales tax. Stripe's own card fee (about 2.9% + 30 cents) is charged on your Stripe account. If you refund an order within 24 hours of the sale, the store fee comes back to you.
- What buyers get: the original, full-size file, without your watermark. Their download link works for 1 year while the gallery is online.
Good to know: only the account owner can set up the store. Team members don't see the store pages.
Before you start
The store opens once these four steps are done. Until then, your Home page shows "Start selling photos from your galleries" with the steps still to do.
- A plan that includes the store. Your fee is shown in Store settings. If your plan doesn't include the store, you see "Your current plan doesn't include the photo store." See Manage your plan and subscription.
- Agree to the store terms in Store settings.
- Connect Stripe to get paid. If you already connected Stripe for invoices, this step is already done. See Connect Stripe to get paid.
- Create a price sheet on the Price sheets page.
Store settings
Open Store > Store settings.
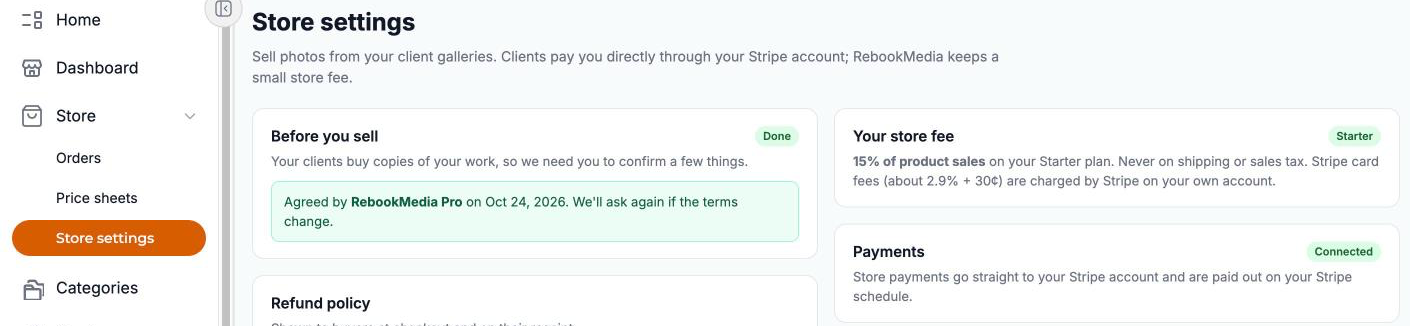
- Before you sell: because buyers get copies of your work, you confirm that you created or are licensed to sell the photos, that you have the releases you need (people, property, venues), that you are the seller (responsible for your prices, sales tax, refunds and customer service), and that you agree to the store fee and payouts through Stripe. Tick all four boxes, type your full name exactly as it is on your account, and click I agree. You will see "Thanks, you're all set to sell."
- Refund policy: the text buyers see at checkout and on their receipt. The default is "Digital photos are final sale. If a download doesn't work, contact us and we'll fix it or send a new link." Change it and click Save (up to 2,000 characters). Leave it empty and save to go back to the default. To refund an order, see Store orders and receipts.
- Your store fee: the percentage for your plan.
- Payments: shows Connected when Stripe is connected, or a Connect Stripe button.
If the store terms change, you are asked to agree again before you can keep selling.
Create a price sheet
A price sheet sets what buyers pay. Each gallery and your portfolio use one price sheet, so you can have different prices for different kinds of work (for example real estate and weddings).
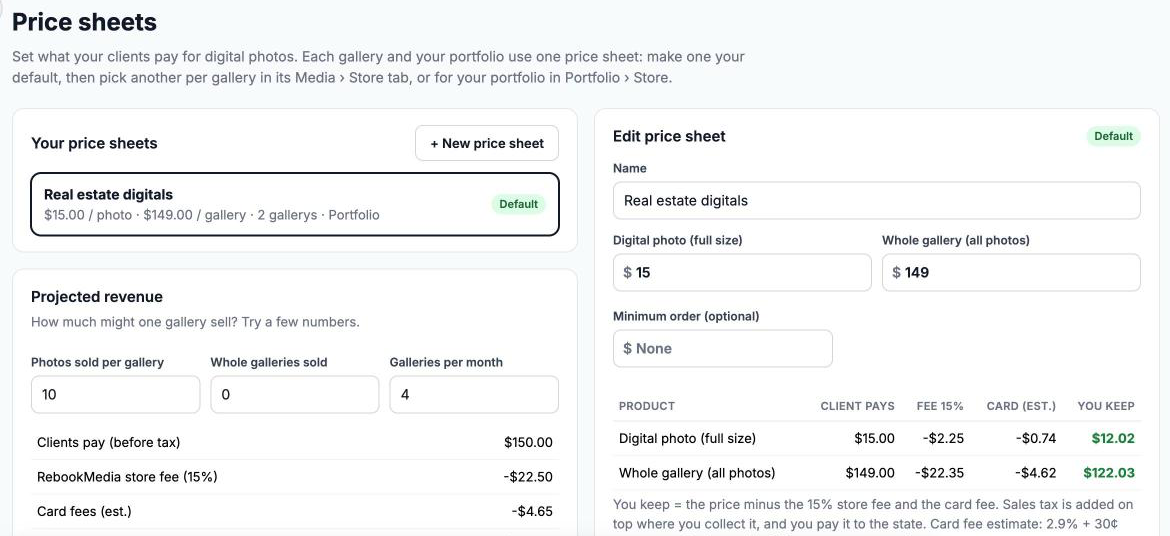
- Open Store > Price sheets and click + New price sheet.
- Enter a Name, for example "Real estate digitals".
- Enter a price for Digital photo (full size).
- For Whole gallery (all photos), choose Fixed price (one price for any gallery) or % off all photos (from 1% to 90% off), and enter the amount. Leave the whole gallery empty with Fixed price if you only sell single photos.
- Optionally set a Minimum order.
- Click Save price sheet. Your first price sheet becomes your default.
With % off all photos, the whole gallery price follows the size of each gallery: the photos for sale in it, times the photo price, minus your discount. For example, at $15 a photo and 20% off, a 5-photo gallery sells for $60 and a 40-photo gallery for $480. A buyer who already bought some of the photos pays only for the ones they don't have yet. This option needs a photo price.
Under the prices, a table shows what the client pays, the store fee, the estimated card fee and what you keep for each product (with % off, for an example gallery). The Projected revenue card lets you try a few numbers (photos sold per gallery, whole galleries sold, galleries per month and, with % off, photos in a gallery) to see what a month could look like.
- To make another sheet your default, open it and tick Make this my default price sheet.
- To remove a sheet, click Remove and then Remove? to confirm. Galleries using it switch to your default sheet. If you remove your last sheet, every gallery store and your portfolio store are turned off.
Sell from a gallery
- Open the project and click Media.
- In the panel next to the cover photo, click the shopping bag icon to open Store.
- Turn on Sell photos from this gallery.
- Choose the Price sheet for this gallery (your default is selected). With a % off sheet, the tab shows what the whole gallery sells for in this gallery, for example "Whole gallery here: 5 photos × $15.00, 20% off = $60.00".
- Choose what is for sale, and the free download options (below).
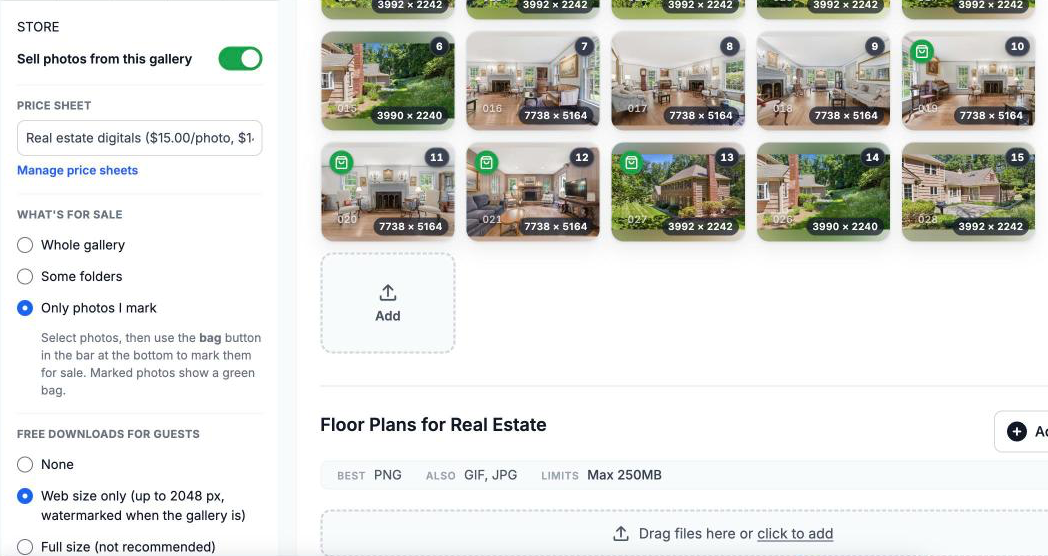
Settings save as you change them. The bottom of the panel shows how many photos are for sale, for example "4 photos for sale. Visitors see a bag on these photos and can buy them in the gallery." A store icon on the project page also shows whether the gallery store is on, with its sales so far.
Tip: until the four setup steps are done, the switch is greyed out and the panel lists what is missing under "Finish setting up your store first".
Choose what is for sale
- Whole gallery (the default): every photo.
- Some folders: tick the folders to sell. See Deliver photos and media to organize a gallery into folders.
- Only photos I mark: select photos, then click the bag button in the bar at the bottom to mark them for sale (the other bag button takes them off sale). Marked photos show a green bag.
Only photos are sold: videos, edited versions and photos in hidden folders are never for sale.
When a buyer buys the whole gallery, they get the photos that are for sale in it at that time. If you add photos for sale later, they get those too.
Free downloads and your client
When the store is on, these settings decide who can still download photos for free.
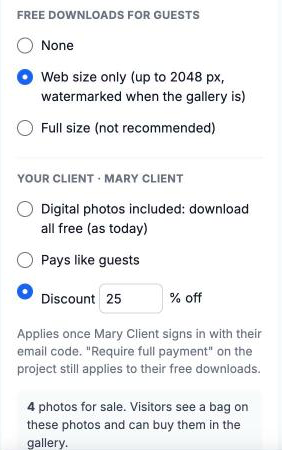
- Free downloads for guests: None (the default; guests must buy), Web size only (up to 2048 px, watermarked when the gallery is), or Full size (not recommended).
- Your client: Digital photos included (the default; your client downloads everything free, as before), Pays like guests, or a Discount of a percentage off.
- These rules apply only to photos for sale. Photos that aren't for sale follow the gallery's Allow Media Download switch, as they would without a store.
- Your client is recognized once they sign in to the gallery with their email code (or Google). Until then they are treated as a guest.
- Free downloads also need Allow Media Download turned on in the gallery's settings. If your project uses "Require full payment", that still applies to your client's free downloads.
Sell from your portfolio and website
You can also sell single photos from your portfolio, which visitors buy on your website.
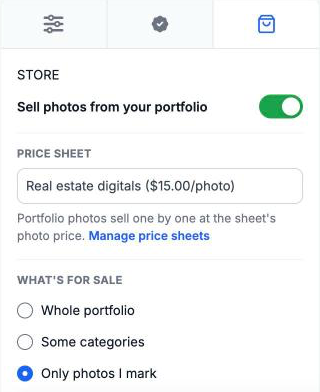
- Open Portfolio (in Storefront) and click the shopping bag tab.
- Turn on Sell photos from your portfolio.
- Choose a Price sheet. Portfolio photos sell one by one at the sheet's photo price, so pick a sheet that has a photo price. If it has none, a yellow box says so and the store won't turn on.
- Choose Whole portfolio, Some categories or Only photos I mark (the default for the portfolio).
Visitors see a bag on photos for sale on your website and can buy them there. The Watermark tab lets you watermark all portfolio photos or only photos for sale on your website; buyers still get the original without a watermark. See Manage your portfolio.
Sales tax on store orders
If you collect sales tax, it is added automatically to store orders where digital photos are taxed and the buyer's billing ZIP is in a state where you collect. Otherwise the buyer sees a note such as "Digital photos aren't taxed in NY." See Set up sales tax.
Troubleshooting
The Sell photos switch is greyed out
One of the four setup steps isn't done. The panel lists what is missing; click each link to finish it.
Buyers don't see the bags on my website
- Check that Sell photos from your portfolio is on and that photos are for sale.
- Check that the portfolio's price sheet has a Digital photo price. A sheet with only a whole-gallery price can't sell portfolio photos.
- The store doesn't show in the website preview. Open your live website to check.
My store stopped selling
A store closes if your plan no longer includes it, Stripe is disconnected, or the store terms changed and you haven't agreed again. Open Store settings to see what is needed.
Guests can't download any photos
With Free downloads for guests set to None, guests can't download the photos that are for sale; they can buy them. Photos that aren't for sale follow the gallery's Allow Media Download switch. Choose Web size only if you want guests to download small copies of the photos for sale for free.
"Pick at least one folder to sell."
With Some folders chosen, tick at least one folder, or choose Whole gallery.
"Please type your name as it is on your account"
Type your first and last name exactly as shown above the box. If your name is missing, add it in Settings first.
Still stuck? Book a free 30-minute call with our support team and we will walk through it with you.