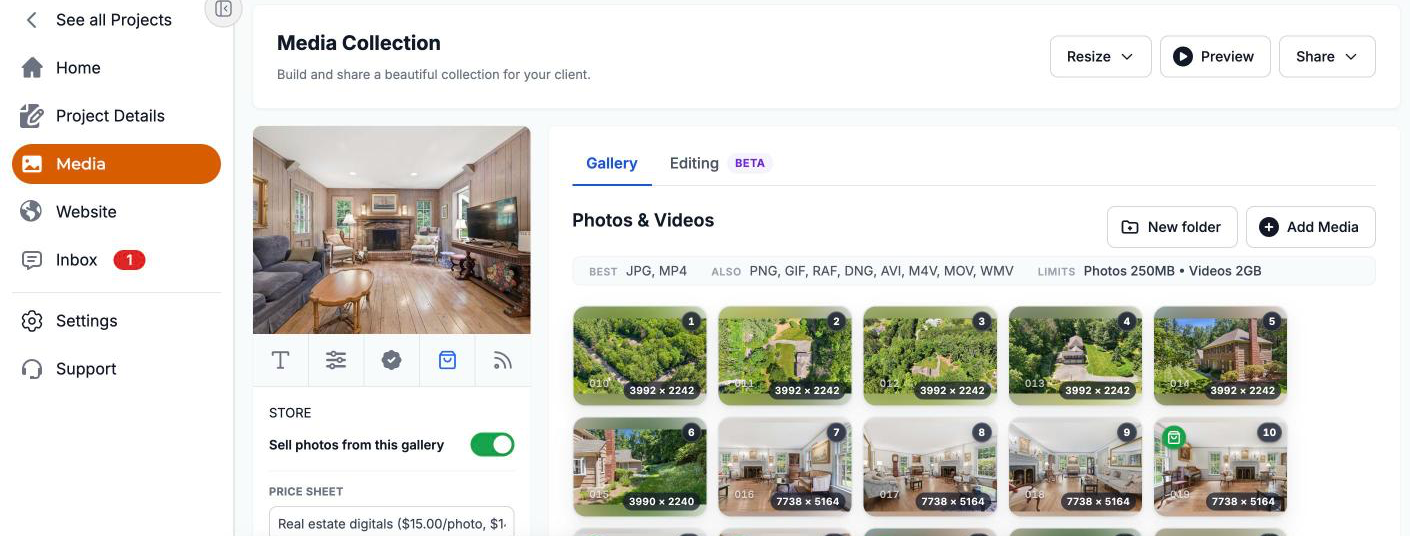
Every project has a Media Collection. This is where you upload the finished photos, videos and files for the job, and share them with your client as a branded online gallery. Clients can view, favorite, download and share their media, and you control what they can do.
This article covers uploading, organizing, watermarks, gallery settings, sharing, and what your client sees.
Where to find it: Open the project, then click Media in the left menu. On a phone, tap the menu icon at the top left first to open the menu.
In this article
- Sections and file types
- Upload media
- Organize with folders
- Organize your media
- Set up the gallery
- Protect your photos with a watermark
- Password protection
- Share the gallery with your client
- What your client sees
- See what your client favorited
- Send photos to your editor
- Troubleshooting
- Related articles
Sections and file types
- Photos & Videos: JPG and MP4 work best. PNG, GIF, RAF, DNG, AVI, M4V, MOV and WMV are also accepted. Photos up to 250 MB, videos up to 2 GB.
- Floor Plans for Real Estate (Real Estate projects only): JPG, PNG or GIF images, up to 250 MB.
- Other Attachments (Real Estate projects only): PDFs and other files, such as brochures. PDFs and photos up to 250 MB, videos up to 2 GB.
Tip: Upload JPG photos for delivery. RAW files (RAF, DNG) are large and many clients can't open them.
Upload media
- Click Add Media on the section you want (or the Add tile), or drag files onto the section.
- Choose as many files as you like. A card at the bottom right shows the progress ("Uploading X of Y") and the time remaining.
- Keep the page open until you see "N files uploaded". If you try to leave while files are uploading, your browser asks you to confirm.
Uploads that fail are retried automatically. Each photo shows its size in pixels, so you can check you uploaded the full-size files.
Organize with folders
Split Photos & Videos into folders, such as Getting Ready, Ceremony and Reception, or Exterior and Interior. Your client sees one tab per folder.
- Click New folder, type a Folder name (or pick an idea) and click Create Folder. The first time, your current photos go into a folder called "Photos", which you can rename.
- Upload straight into a folder with its upload icon, or choose the folder under Upload to folder when you add media.
- Move photos by dragging them onto a folder, or select them and click Move to folder in the bar at the bottom.
Each folder's menu lets you Rename, Select all in folder, Download folder (ZIP), Hide from client (for example for outtakes), move it up or down, or Delete folder (you choose whether its photos move to another folder or are deleted with it).
Organize your media
- Reorder: drag photos into the order you want (long-press first on a phone). Drag a selected photo to move the whole selection. "Moved N photos" appears with an Undo button.
- Select several: click photos, Shift-click to select a range, or drag a box around them. Press Ctrl/Cmd+A to select all and Esc to clear. The bar at the bottom lets you download, move, watermark or delete the selection.
- Photo size: use Resize (on a phone, Photo size: Small, Medium or Large) to change how big the thumbnails are.
- Photo ID: each item has a number (for example 001) that stays the same even if you reorder. Clients see it, so they can tell you exactly which photo they mean.
Click the menu on a photo for more options:
- Open: details of the file.
- Update: replace the file with a new version. It keeps its Photo ID, position and favorites, which is handy after re-editing a photo.
- Download: download the original file.
- Set as cover: use the photo as the gallery's cover.
- Enable/Disable Watermark Protection: watermark this photo or not.
- Delete: remove it from the collection.
Your own downloads are always the original files, without a watermark.
Set up the gallery
Use the tabs on the left of the Media page:
- Typography: the gallery's title (your project title to start with) and subtitle, both optional.
- Settings: turn Allow Favorite, Allow Media Download and Allow Social Sharing on or off, and set a password. They save straight away.
- Watermark: see below.
- Store: sell photos from the gallery.
- Activities: see what your client favorited.
To change the cover, use Set as cover on a photo, hover over the cover and click Change Cover, or drag a photo onto the cover. Click Preview at the top to open the gallery the way your client sees it.
Good to know: turning off downloads hides the download buttons, but clients can still view the photos. To protect photos until you are paid, use a watermark.
Protect your photos with a watermark
- Choose your watermark style once in Settings > Business > Watermark.
- On the Media page, click the Watermark icon and turn on Enable Watermark.
- Click Apply Watermark to All Media, or protect selected photos only. Protected photos show a green Protected badge.
Protected photos are left out of "download all", and single downloads give the watermarked version. Turn the watermark off when you are paid to deliver the clean photos. See Protect your photos with watermarks for every option.
Password protection
- Open the Settings tab on the left and turn on Enable Password Protection.
- Enter a Collection password of at least 8 characters, with an upper case letter, a lower case letter and a number.
- Click Save. The password isn't applied until you save.
Anyone opening the gallery then needs the password. Click Copy password to paste it into a message for your client. After too many wrong guesses, visitors are asked to wait 15 minutes.
Share the gallery with your client
Click Share at the top of the Media page:
- Share by email: your client's email is filled in. Add more people by typing their email and pressing Enter. Tick the box to include the password if the gallery is protected, then click Send.
- Get direct link: copies the gallery link, so you can send it any way you like.
When you mark the project Completed (status menu at the top right of the project), your client is also emailed that their photos are ready, with a View Photos button.
What your client sees
- A cover page with your title, subtitle and business name, and a View Gallery button.
- Their photos (with a tab for each folder), then videos, then floor plans and other attachments for Real Estate projects.
- A full-screen viewer with zoom, a strip of photos and swipe on phones, and a Slideshow.
- Buttons to Favorite, Download and Share, depending on your settings. On phones, downloads save straight to their Photos.
- Once you mark the project Completed, they can also see and download their files in their RebookMedia account, under Projects, for 30 days.
To favorite photos, your client enters their email and the 6-digit code we email them. They can then come back to their favorites at any time and share the list. See View, favorite and download your photos.
See what your client favorited
- On the Media page, open the Activities tab and click Favorite Activity.
- Each row shows who made favorites. Click the menu on a row and choose Open Details to see the Photo IDs they picked, Get direct link, or Download All.
Download All prepares a ZIP of the original files in a card at the bottom right. Keep working; click Download when it says "Your ZIP is ready". You also get an email the first time your client favorites something.
Send photos to your editor
If someone edits your photos, open the Editing tab on the Media page. Send your editor the RAW files, review their finished photos side by side with the originals, pay them, and publish the approved photos straight into Photos & Videos. Your client sees nothing until you publish. See Send photos to your editor.
Troubleshooting
A file was rejected
- Check the file type for the section (see Sections and file types).
- Photos and PDFs must be 250 MB or less, and videos 2 GB or less.
- iPhone HEIC photos: export them as JPG first.
My client sees "Protected preview, Being prepared"
The watermark is still being added. Give it a few minutes and refresh. If it doesn't clear, replace the photo with Update (same file) to try again.
My client's download is missing some photos
Watermarked photos and folders hidden from your client aren't included. Remove the watermark or show the folder when you are ready.
My client sees the sample cover
Set a cover photo with Set as cover.
A setting won't stay on
If password protection is on, the password must be filled in and strong enough, or other settings won't save. Fix the password and try again.
"Please wait until your uploads finish, then try again."
Folders can't be changed while files are uploading. Wait for the upload to finish.
I don't see Floor Plans or Other Attachments
Those sections are only shown for projects in the Real Estate category.
Still stuck? Book a free 30-minute call with our support team and we will walk through it with you.