A project holds everything for one job: the client, the services and price, visits (appointments), to-dos, invoices, payments, contracts and the photos you deliver. Projects are created for you when clients book online, and you can create them yourself for jobs you book by phone or email.
This article covers creating a project, finding it in your Projects list, the project page, visits, to-dos, and project statuses.
Where to find it: Click Projects in the left menu. On a phone, tap Projects in the bar at the bottom of the screen.
In this article
- Before you start
- Create a project
- The Projects list
- The project page
- Add services and pricing
- Schedule visits
- Add to-dos
- Complete, cancel or reopen a project
- Projects from online bookings
- Troubleshooting
- Related articles
Before you start
- Choose your category. You need at least one category before you can use Projects.
- Set up your services. Projects use your services and prices, so set them up first (see Create and manage your services).
- Check your plan. Your plan includes a set number of open projects. In-progress and completed projects count; cancelled ones don't.
Create a project
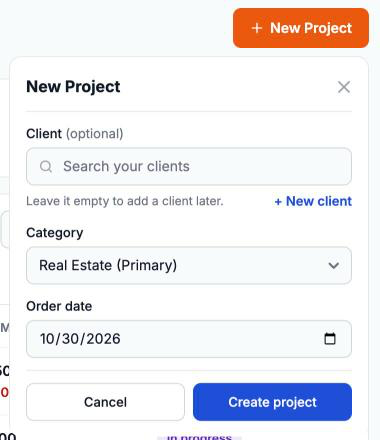
- Click New Project on the Projects page (or in the Projects card on your Home page).
- Under Client, search your clients by name or email and pick one, or click + New client to add someone new. You can leave it empty and add the client later.
- Choose the Category (your primary category is selected) and the Order date (today, unless you change it).
- Click Create project.
- The new project opens with its title ready to edit: type a name and press Enter.
If you skip the name, the project is called something like "[Client] - [Category]". It starts with one empty service line; then add your services and schedule a visit.
Tip: to start a project for a particular client, open the client on the Clients page and click New Project there; the client is already filled in.
The Projects list
The Projects page shows every job, its next visit and what's still owed.
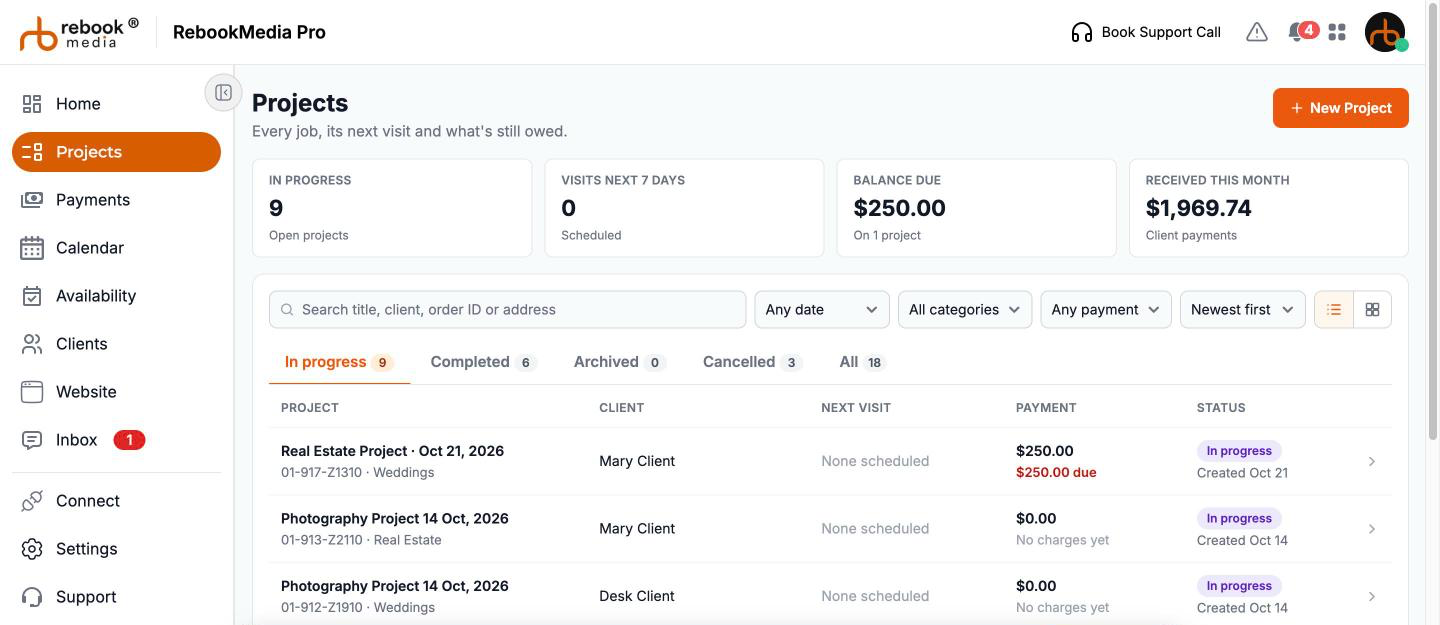
- Summary tiles: In progress (open projects), Visits next 7 days, Balance due (what clients still owe) and Received this month. Click a tile to see those projects (Received this month opens your Payments page).
- Status tabs: In progress, Completed, Archived, Cancelled and All, each with a count. In progress is shown at first.
- Search: type a title, client, order ID or address; the list updates as you type.
- Filters: date (this month, last 30 or 90 days, this year or custom dates), category (if you use more than one), payment (Balance due or Paid in full) and sort (newest, oldest, next visit, balance due, client A-Z or project A-Z).
- List or Gallery: switch with the two icons. The list shows each project's title, order ID and category, client and city, next visit, payment and status; the gallery shows photos from each project. Your choice is remembered.
Click any project to open it. Projects are shown 30 per page; use Next and Previous to see more. On a phone, tap Filters to show the filters, and each project is shown as a card.
Tip: your filters are kept in the page address, so you can bookmark a view you use often, such as Balance due.
The project page
At the top of the project, a bar that stays visible as you scroll shows the title, the Category and the Status.
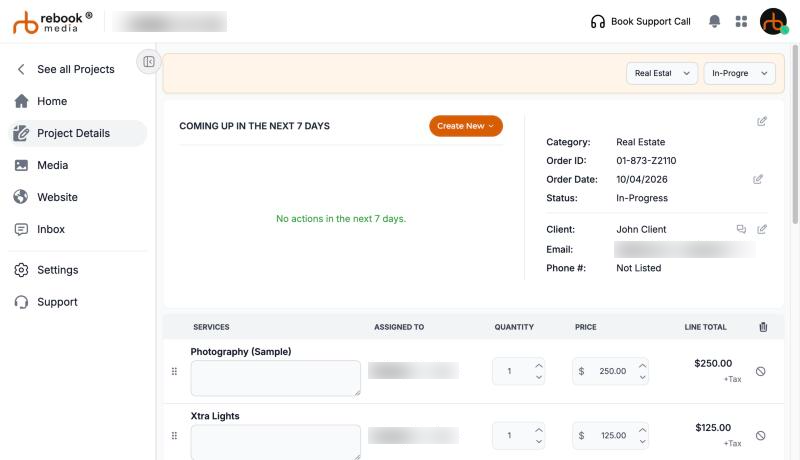
- Title: click the pencil next to it, type the new title and click Save. A clear title (for example the property address) makes the project easier to find.
- Order Date: click the pencil to change it.
- Client: click the pencil (Change Client) to pick a client, or choose Add New Client to add one. See Manage your clients.
- Create New: add a Visit, To Do, Invoice or Contract.
- Coming Up In The Next 7 Days: upcoming visits and to-dos that are due soon or overdue.
- Tabs at the bottom: Visits, To Do, Invoices and Contracts.
Use the left menu inside a project to open its Media (the photos you deliver), its Contracts, and for Real Estate projects its Website. Click See all Projects to go back to the list.
Add services and pricing
- Click Add a Service Line.
- Choose the service and option, or Custom to type your own.
- Set the Quantity and Price, and the team member in Assigned To if someone else is doing it.
Changes save automatically. Drag lines to reorder them, or click the trash icon and Yes, Remove to remove one. The Order Summary adds up the total, tax, discount, payments and balance due. To bill the client, see Send invoices and get paid.
Schedule visits
A visit is an appointment: a shoot, a consultation or a follow-up.
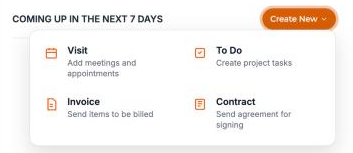
- Click Add Visit (or Create New > Visit).
- Enter a Visit Name, for example "Property Shoot".
- Choose who is doing it: you or a team member.
- Optionally add the address: click the pencil, enter the Visit Address and Unit, and click Save Changes.
- Choose the Visit Date, Start Time and End Time (one hour after the start by default), and check the Booking Timezone.
- Leave Send visit updates to the client ticked to email your client an invitation with the date, time and location.
- Click Schedule Visit.
- The project needs a client before you can schedule a visit.
- To change a visit, click the Reschedule Visit icon on it. Your client is emailed if the updates box is ticked.
- To cancel a visit, click the Cancel Visit icon and Yes, Cancel. Your client is always emailed when a visit is cancelled.
- Visits are marked completed automatically once their start time has passed.
- If your Google Calendar is connected, visits are added to it.
Add to-dos
- Click Add To-Do (or Create New > To Do).
- Enter a Name and the Due On date. Leave the time blank for an all-day to-do.
- Add Notes if you like and click Save To-Do.
Tick a to-do to mark it done. To-dos are private to you, and are added to your Google Calendar if it is connected.
Complete, cancel or reopen a project
Use the Status menu at the top of the project. The change happens straight away.
- Mark Completed: use this when the job is delivered. Your client is emailed that their photos are ready, and their media becomes available in their RebookMedia account for 30 days. If you have a team, their pay for the project becomes due.
- Cancel Project: for jobs that aren't going ahead. Your client isn't emailed. Visits and invoices aren't changed, so cancel or void those yourself.
- In-Progress: reopens a completed or cancelled project.
Projects can't be deleted. Cancelled projects stay under the Cancelled tab. In-progress and completed projects count toward your plan's project limit; cancelled projects don't.
Projects from online bookings
When a client books you online, RebookMedia creates the project for you: it adds the client to your client list, adds the services they booked, schedules the visit, and records any deposit they paid. You will find it at the top of your In progress projects.
Troubleshooting
The New Project button shows a lock
You have reached your plan's project limit. Click it to see your options: upgrade straight away, or cancel projects that aren't going ahead to make room. See Manage your plan and subscription.
I can't find a project
- Open the All tab: completed, archived and cancelled projects aren't in In progress.
- Search by the client's name or email, the order ID or the address.
- If you see "No projects match these filters", click Clear filters.
I can't schedule a visit
Add a client to the project first. Also check that you, or a team member, are set up to provide services.
The client isn't shown on the project
Click the pencil next to Client and pick them again.
My client can't see their photos
Clients see their media in their account after you mark the project Completed. You can also share the gallery link from the project's Media page at any time.
Still stuck? Book a free 30-minute call with our support team and we will walk through it with you.