Online booking lets clients book and pay a deposit for your services 24/7, from your RebookMedia profile and your own website. Each booking creates a project, adds the client to your client list, schedules the visit and sends everyone a confirmation.
This article covers what to set up first, turning on online booking, your booking rules, your terms, sharing your booking page, and what happens when a client books.
Where to find it: Click Settings in the left menu and open the Bookings tab. On a phone, tap the menu icon at the top left first to open the menu.
In this article
- Before you start
- Write your terms and cancellation policy
- Turn on online booking
- Set your booking rules
- Share your booking page
- What happens when a client books
- Turn online booking off
- Troubleshooting
- Related articles
Before you start
Clients can only book what you have set up, so check these first:
- Services with prices and durations, and any deposits. See Create and manage your services.
- Availability: the days and hours you work. See Set your availability.
- Service areas: the places you travel to. See Set up your service areas.
- Stripe: connect it on the Connect page (left menu) to take deposits. Services without a deposit can be booked without Stripe.
- Your plan: online booking is included in some plans. See Manage your plan and subscription.
Write your terms and cancellation policy
- On the Bookings tab, find Terms of Service & Cancellation Policy.
- In TOS, write your terms of service: at least 300 characters, up to 2,500. A counter shows how many you have used.
- In Cancellation Policy, write your policy: what happens if a client cancels or reschedules, and whether deposits are refunded. At least 300 characters.
- Click Save. You will see that your terms and policy were saved.
Clients must tick "I accept [your business] terms and conditions and cancellation policy" before they can book, and your policy is shown on their booking afterwards.
Turn on online booking
- On the Bookings tab, in Bookings, switch on Allow Bookings. It saves straight away and the page reloads.
- If you haven't added your business address yet, a window asks "Where is your business located?". Start typing, pick your address from the list and click Save changes. Check that Allow Bookings is on afterwards.
- If your plan doesn't include online booking, the switch turns back off and offers an upgrade.
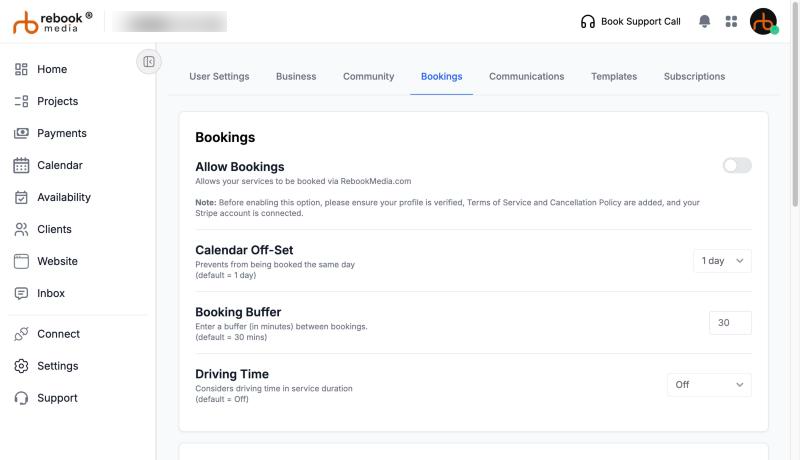
Good to know: the page suggests having a verified profile, your Terms of Service and Cancellation Policy, and Stripe connected before turning on bookings. Your terms and Stripe are what clients see and pay through, so set them up first.
Set your booking rules
- Calendar Off-Set: how many days ahead clients must book (0 to 14 days). 1 day (the default) stops same-day bookings.
- Booking Buffer: minutes kept free after each booking (default 30). Type a number.
- Driving Time: Off, One-Way or Round-Trip. Adds travel time from your business address to each booking.
Each rule saves as soon as you change it. These rules unlock once your profile is verified and your Terms of Service, Cancellation Policy and Stripe connection are set up; until then the defaults apply (1 day ahead, 30-minute buffer, no driving time).
Share your booking page
- Your RebookMedia profile: share your profile address (rebookmedia.com/pro/your-name/your-category). Clients open the Booking tab and click Start Reservation.
- Your website: your RebookMedia website has a booking page at /book (for example yourname.rebookmedia.com/book), and templates link to it from their Book Now buttons.
- Clients can also find you in the RebookMedia directory when your category is listed.
What happens when a client books
- The client chooses services, an address, a professional, a date and a time, accepts your terms and pays any deposit.
- RebookMedia adds the client to your Client Directory and creates a project with the booked services, the visit and any deposit payment.
- You and your client each get a "Booking Invitation" email with the date, time and location, and a calendar invite. If your Google Calendar is connected, the visit is added to it and Google sends the client the invite.
- You get a text message too if your mobile number is verified in Settings > User Settings, and so does your client if theirs is.
- If the client chose a team member, that person is notified that they have a new job.
Find the new booking at the top of your In-Progress projects. Send an invoice for the rest of the price when you are ready (see Send invoices and get paid).
Turn online booking off
Switch off Allow Bookings. Your profile then shows a Contact Me button instead, and your booking page shows "Booking Unavailable". Existing bookings aren't affected.
Important: if your plan doesn't include online booking, you can turn it off but not back on without upgrading.
Troubleshooting
Allow Bookings turns itself back off
- If an upgrade window opens, your plan doesn't include online booking. Upgrade your plan in Settings > Subscriptions.
- If an address window opens, add your business address and save it, then check the switch again.
Calendar Off-Set, Booking Buffer or Driving Time are greyed out
These rules unlock once your profile is verified and your Terms of Service, Cancellation Policy and Stripe are set up. Schedule a support call if you need them changed.
Clients see "This professional can't take deposits online right now"
Connect Stripe on the Connect page, or turn off deposits on your services.
Clients see "No available times for this day"
Check your availability, your services' durations, your booking buffer and driving time, and your Google Calendar. See Set your availability.
Clients see "This Pro does not service this address"
Add the client's area to your service areas.
My booking rules didn't save
Booking Buffer must be a whole number of minutes (0 to 999). Refresh the page to check the saved value.
I didn't get a text for a new booking
Verify your mobile number in Settings > User Settings.
Still stuck? Book a free 30-minute call with our support team and we will walk through it with you.