RebookMedia has contracts built in. Write the contract on a project (or start from a template), fill in the details, and send it to your client. Your client signs online from any device, without signing in, and both of you get a copy when everyone has signed.
This article covers creating a contract, the form fields and tokens you can use, signing options, sending and reminders, editing and voiding, contract templates, and the terms clients accept when they book online.
Where to find it: Open the project, then click Create New > Contract, or open the Contracts tab at the bottom of the project and click Add Contract. On a phone, tap the menu icon at the top left first to open the menu.
In this article
- Before you start
- Create a contract
- Form fields and tokens
- Choose how the contract is signed
- Send the contract
- What your client sees
- Counter-sign and complete
- Edit or void a contract
- Contract templates
- Terms for online bookings
- Troubleshooting
- Related articles
Before you start
- Add the client to the project. The contract goes to the project's client, and the client must have an email address.
- Set up a template (optional). If you use the same contract often, save it as a template in Settings > Templates and set it as your default. New contracts then open with it.
Create a contract
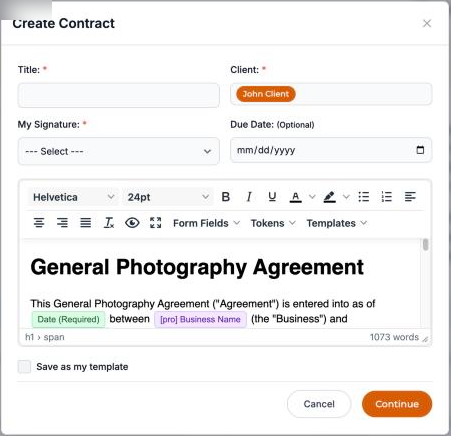
- On the project, click Create New > Contract (or Create Contract, or Add Contract in the Contracts tab).
- Enter a Title. Your client sees it.
- Check the Client: it is the project's client.
- Choose My Signature (see Choose how the contract is signed below).
- Optionally set a Due Date.
- Write the contract, or choose one from the Templates menu in the editor. Choosing a template replaces what is already in the editor.
- Optionally tick Save as my template and enter a Template Name to reuse it later.
- Click Continue. You will see "Contract created successfully!" and the contract page opens.
The contract starts as a Draft. Nothing is sent to your client until you send it.
Form fields and tokens
Use the editor's toolbar to add details that change for each client:
- Tokens: fill in details automatically, such as your business name, the client's name, email, phone and address, and the project title, ID, order date and category. Tokens show the current details whenever the contract is opened.
- Form Fields: Client Initial (your client initials it), and Date, Checkbox, Short Text Box and Rich Text Box (you fill these in on the contract page before sending, for example the event date or package). Each can be Required or Optional.
Good to know: you must fill in every required field before you can send or sign. Until then you will see "Please fill in all required fields." Your client sees any field you left empty as "To be completed by" your business.
Choose how the contract is signed
- Counter sign: your client signs first, then you sign. The usual choice.
- Photographer sign first: you sign first, then your client.
- Not required: you sign when you send it, then your client signs.
Signatures are typed: each person types their full name, and it is shown in a signature-style font with the date.
Send the contract
Open the contract page (click View on the contract in the Contracts tab) and fill in any required fields. Then:
- Counter sign: click Send Contract.
- Photographer sign first or Not required: type your full name in your signature box and click Sign & Send Contract.
You will see "Contract sent to client successfully." Your client receives an email from your business, "Contract Ready for Your Signature", with a View & Sign Contract button.
- To send the email again, click Send Reminder on the contract page. Reminders aren't sent automatically.
- Click View Live to see the contract the way your client does.
What your client sees
- Your client opens the link in the email. They don't need to sign in.
- They read the contract and fill in any Client Initials boxes.
- They type their full name in Type signature and click Sign Contract. If the name doesn't match theirs exactly, they are asked to confirm.
Your client can click Print to print the contract or save it as a PDF from their browser's print window.
Counter-sign and complete
With Counter sign, you get an email when your client signs ("Action Required: ... has signed your contract") and an app notification. Then:
- Open the contract and click Counter-Sign Contract.
- Type your full name in your signature box and click Sign Contract. If you see "Signature Mismatch", click Yes to confirm.
When everyone has signed, the contract shows Signed, and both you and your client get a "Contract Fully Executed" email with a link to the completed contract.
Contract statuses
- Draft: not sent yet.
- Sent: waiting for your client to sign.
- Partially Signed: one of you has signed.
- Signed: everyone has signed.
- Void: cancelled; it can no longer be signed.
- OVERDUE also appears when the due date has passed and the contract isn't signed yet. Clients can still sign after the due date.
Edit or void a contract
- Edit: click Edit on the contract page or in the Contracts tab, make your changes and click Continue. If nobody has signed yet, the contract is updated. If someone has signed, you are asked to confirm: the signed version is voided, a new version is created, and your client will need to sign again.
- Void: click Void, then Yes. This can't be undone. Your client is emailed only if they had already signed.
Important: editing a contract creates a new signing link, so the link in the email your client already has stops working. After editing, click Send Reminder to send your client the new link.
The contract page shows each version (Version 1, Version 2 and so on) and when the contract was created, edited and sent. To keep a copy, click View Live, then Print, and save it as a PDF.
Contract templates
Go to Settings > Templates and choose the Contracts filter.
- Starter Templates from RebookMedia can be previewed, or added with Use as my template so you can change them.
- My Templates are shared with your team. Each has Edit, Rename, Duplicate, Set as default and Delete.
- Click New Template to write one from scratch. Contract templates can use form fields and tokens.
- Set as default makes a template open automatically in Create Contract.
Deleting a template doesn't affect contracts you already sent.
Terms for online bookings
Clients who book you online accept your terms before booking. Set them in Settings > Bookings, in Terms of Service & Cancellation Policy: enter your TOS and Cancellation Policy (each 300 to 2,500 characters) and click Save. Both are required before you can turn on online bookings.
On your booking page, clients must tick "I accept ... terms and conditions and cancellation policy" before they can book. Use a contract on the project for anything more detailed, such as wedding-day agreements.
Troubleshooting
My client says the contract link doesn't work
The contract was edited after you sent it, which creates a new link. Click Send Reminder to email the new link.
"Please fill in all required fields"
Fill in every required Date, Checkbox and Text field on the contract page (they are outlined) before sending or signing.
I can't sign: "Awaiting client signature"
With Counter sign, your client signs first. You can sign once they have.
"Signature Mismatch"
The typed signature doesn't match the full name on the account. Type your full name, or click Yes if the signature is correct.
A teammate's contract shows "Contract Not Found"
Contracts open for the person who created them. Ask the teammate who created it to make changes.
"Client email is missing"
Add an email address to the client (Clients page > Edit), then send again.
Still stuck? Book a free 30-minute call with our support team and we will walk through it with you.