Templates save you from writing the same contract or email again and again. Write it once, add tokens that fill in your client's name, the project and invoice details automatically, and pick the template whenever you send. You can also set a default so it opens automatically.
This article covers the Templates page, starter templates, creating and editing templates, tokens, defaults, and using templates when you send.
Where to find it: Click Settings in the left menu and open the Templates tab. On a phone, tap Settings in the menu at the bottom of the screen, then scroll the tabs to Templates. You can also click Manage templates... at the bottom of the Templates menu in any send window.
In this article
- Types of templates
- Starter templates
- Create a template
- Add tokens
- Edit, rename, duplicate or delete
- Set a default template
- Use a template when you send
- Tips
- Troubleshooting
- Related articles
Types of templates
Each template has a type, which decides where it can be used. Use the chips at the top of the page to show one type at a time.
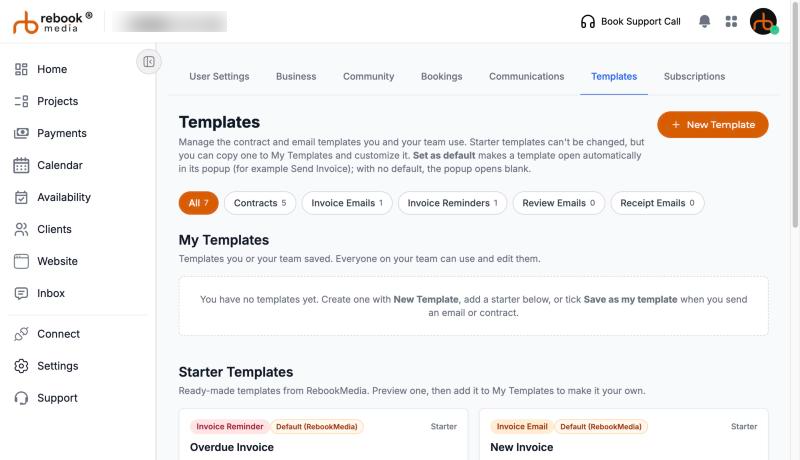
- Contracts: used in Create Contract.
- Invoice Emails: the email sent with Send Invoice.
- Invoice Reminders: used by Send Reminder on an unpaid invoice.
- Review Emails: used by Send Reminder when asking for a review.
- Receipt Emails: used by Send Receipt on a paid invoice.
- Client Emails: used when you email a client from the Clients page or their profile, and when you reply to a lead.
The page has two sections: My Templates, the templates you have saved, and Starter Templates, ready-made templates from RebookMedia.
Starter templates
RebookMedia provides starter templates, such as contracts for general, wedding, event, newborn and commercial photography, and invoice emails. Starters can't be changed, but you can:
- Preview a starter to read it.
- Click Use as my template to copy it into My Templates. The copy opens in the editor so you can make it your own.
- Set as default to use it as it is.
Starters also appear in the Templates menu of each send window, so you can use one without copying it.
Important: the starter contracts are a starting point, not legal advice. Read them carefully and change them to fit your business and local laws.
Create a template
- Click New Template.
- Enter a Template Name (up to 100 characters), for example "Wedding Contract".
- Choose the Type.
- For emails, enter a Subject (optional).
- Write the content in the editor. Use the toolbar for fonts, bold, colors, lists and alignment, and the Tokens menu to add details that fill in automatically.
- For contracts, use Form Fields to add places your client fills in: Client Initial, Date, Checkbox, Short Text Box or Rich Text Box, each required or optional.
- For reminder emails, click Attach Files to add up to 5 files (10 MB in total): JPG, PNG, GIF, PDF, DOCX, CSV or MP4.
- Click Save Template. You will see "Template created."
You can also save a template while you work: tick Save as my template in Create Contract, Send Invoice, Send Reminder or Send Receipt, and give it a name. It is saved when you continue or send.
Add tokens
Tokens are placeholders that are replaced with real details when you send. In the editor, click Tokens and pick one; it appears as a colored chip, such as "[client] First Name".
- Your business: business name.
- Client: first, last and full name, email, phone, company and address.
- Project: title, project ID, status, order date and category.
- Invoice (invoice emails, reminders and receipts): invoice number, status, issue and due dates, subtotal, tax, total, amount paid and the Payment URL (the link to pay online).
- Receipt (receipt emails): payment date, amount paid, amount refunded and a table of the services, payments and refunds.
- Review (review emails): the link for your client to leave a review.
- Client Emails offer only your business name and the client's details, since they aren't linked to a project.
The Tokens menu shows only the tokens that work for the template's type. Always insert tokens from the menu rather than typing them; in contracts, typed tokens aren't replaced. Tokens work in the message, so keep the subject line plain text.
Edit, rename, duplicate or delete
Each of your templates has these options:
- Edit: change the content, subject, attachments and type (email templates can switch between the email types; contracts stay contracts). Click Save Template.
- Rename: change the name only.
- Duplicate: make a copy, named "(copy)", to start a variation.
- Delete: remove it from your Templates menus. Emails and contracts you have already sent aren't affected. Deleted templates can't be restored, so duplicate a template first if you might want it back.
Click a template's name to preview it.
Set a default template
A default template opens automatically in its window, so most of the time you only need to check it and send.
- Find the template (yours or a starter) and click Set as default.
- You will see that it now opens automatically in that window, for example Send Invoice. The card shows a Default badge.
- You can have one default for each type.
- Click Remove default to stop using it. If RebookMedia provides a default for that type, it is used instead (shown as Default (RebookMedia)); otherwise the window opens blank.
- A default contract fills in new contracts only. Contracts you edit keep their own content.
Use a template when you send
- Open the window you need: Create Contract, Send Invoice, Send Reminder or Send Receipt in a project, or Email on a client's profile.
- Click Templates in the editor's toolbar and pick a template. The default is marked "(Default)".
- The template replaces everything in the editor. In Send Reminder it also replaces the subject and the attachments.
- Make any changes for this client, check the subject line, and send.
Tokens are filled in with this client's and project's details when the email or contract is sent. If an invoice email doesn't include the Payment URL token, a View and pay your invoice button is added automatically.
Careful: picking a template replaces what you have already written, without asking. Pick the template first, then make your changes.
Tips
- Add the Payment URL token to invoice reminder templates so clients can pay straight from the reminder.
- Keep contract templates under 50,000 characters, the limit for a contract.
- Create one contract template for each kind of job you do, and set your most common one as the default.
- Use tokens rather than names and dates in your templates, so nothing from a previous client slips through.
Troubleshooting
"Template name is required." or "Template content is required."
Enter a name and some content (form fields count as content).
"You can attach up to 5 files." or "Total attachment size exceeds the 10MB limit."
Remove a file or use smaller files. For large files such as photos, deliver them in the project's gallery instead.
"... has an invalid file type."
Attach JPG, JPEG, PNG, GIF, PDF, DOCX, CSV or MP4 files only.
A token shows as {{...}} in my contract
It was typed rather than inserted. Delete it and insert it again from the Tokens menu.
My template doesn't appear in the Templates menu
Check its type: each window lists only templates of its own type (for example, Send Receipt lists Receipt Emails).
Emoji disappeared from my template name or subject
Names and subjects can't contain emoji or special symbols; they are removed when you save.
I can't see the Templates tab
Templates are available to professional accounts. Team-only logins and client accounts don't have them.
Still stuck? Book a free 30-minute call with our support team and we will walk through it with you.